Running the “Introducing Postman” Sample API on Ubuntu 18

A few weeks ago “Introducing Postman“, my first course for LinkedIn Learning/Lynda.com went live. This course focuses on many of the most useful features for individuals working with Web-based APIs including making requests, organizing requests, managing environments and variables, and sharing authentication methods across requests within folders and collections.

In an effort to minimize 3rd party dependencies that could “break” the course I developed a sample API and constructed all of the demos and exercises around that. I provided instructions for both Windows and Mac users to run the API prior to diving into the Postman demos. Naturally, one of the first questions asked about the course was “How do you run the sample application on Ubuntu 18?”

Now I freely bounce back and forth between Mac and Windows but I’m not what one would consider a Linux aficionado. Upon seeing that question I said to myself “Hmm, that’s a great question!” and set out to learn how to do it myself. I’m writing this with the hope that it answers that question and helps others who run into the same issue.

Installing Ubuntu on Parallels

I don’t generally have access to an Ubuntu box so my first step was getting a VM up and running. I began by obtaining the ISO image for Ubuntu 18.04.2 LTS. This was nearly a 2GB download so I was really happy about my gigabit fiber connection! Installation in a Parallels VM was easy although I did need to tweak some settings to get a resolution better than 600×800.

The next issue was that I wanted to share some files between the environments to help document this process. I verified that Parallels was configured to share my home folder and that it was set to map the Mac volumes to Linux but I couldn’t find the shared folders anywhere within the VM. I had seen warnings that the Parallels Tools are broken on Ubuntu 18. I did stumble upon some instructions on how to get them to run. I snapshotted my VM and tried them out but unfortunately it appears that the Parallels Tools have been updated since those instructions were written and they no longer worked. Since I didn’t plan on keeping this VM around long I gave up trying here and just used a cloud storage account to transfer files between the two environments.

Installing Node.js

The sample API delivered with the course is a node.js application so we need to install node.js to run it. This was pretty easy and required only following this tutorial provided by DigitalOcean which walks us through obtaining the packages through apt. The relevant part of the tutorial is under the heading “Installing the Distro-Stable Version for Ubuntu.”

After installing both node.js and npm I checked the versions and found versions 8.10.0 and 3.5.2 were installed, respectively. The node.js version agreed with that listed in the tutorial but I’m sure that will change at some point.

Running the Sample API

Once node.js and npm are installed we can run the API. As described in the course we need to navigate to the api/node folder from the exercise files. Once there we can run follow the instructions for running on a mac:

  • npm i to install the various dependency packages
  • npm run start-mac to start the sample API

When the API is running you’ll see a message indicating that it is listening on port 3000.

Installing Postman

For the sake of completeness let’s also look at installing Postman on Ubuntu. Postman can be obtained through either the Postman download page as described in the course or through the Ubuntu Software utility. Unfortunately at the time of this writing the version in the Ubuntu Software utility is 6.7.1 which is incompatible with 7.x. I’ve updated a number of my projects already so I opted for downloading the software from getpostman.com and following the installation instructions there.

It turns out that installing Postman in a Linux environment isn’t quite as straightforward as Windows or Mac. Installing it on Ubuntu 18 also requires the additional installation of libgconf-2-4 so be sure to follow those Linux installation instructions carefully.

Making a Request

Once I got Postman installed I was able to log in with the Postman account I used to record the course. I was immediately presented with the history and collections as I left them. I opened the API Status request, sent it, and saw the expected result as described in the course.

Wrapping Up

So there you have it – running the Sample API from my Introducing Postman course on LinkedIn Learning/Lynda.com. The setup itself wasn’t so bad and chances are that if you’re asking the question you won’t be dealing with the VM setup headaches I did when I set out to answer the question. In general I found the overall experience of getting both the sample API and Postman running on Ubuntu 18 to be a bit tiresome but I think a good chunk of that is attributable to my lack of experience with that particular environment.

Regardless, I hope this helped you out!

Goodbye, Amegala

For the past two years I’ve worked with Amegala to bring Indiana the developer conference it deserves. During that time Amegala has gone through some organizational changes and our visions for what the Indy.Code() conference should be have diverged significantly enough that I’ve elected to cut my ties with Amegala. I am no longer affiliated with Amegala or any of the .Code() family of conferences. I’m incredibly proud of what we accomplished with Indy.Code() but the time was right for a clean break.

Despite severing my ties with Amegala I still strongly believe that Indiana needs a world-class, locally-run, technology agnostic, community-driven developer conference and I’m still committed to making that happen. So much so that I’ve already assembled a new team of strong, local development community leaders to do just that!

I’m really excited to announce that on the evening of June 15, Tiffany Trusty, Kevin Miller, and I had our first official meeting! We’re still in the very early planning stages so we don’t have much to report yet but stay tuned – we’ll release more information as our plans materialize!

Conference Planners

Tiffany Trusty, Dave Fancher, and Kevin Miller commemorating their first conference planning session.

I don’t know what Amegala’s future plans are but if you’re looking for a truly Indiana-based conference run by people who know the Indiana development community, this new event is the one for you.

15 Interesting VS Code Settings

I’ve been using VS Code for quite some time now. In fact, given the nature of my work recently I’ve found myself spending more time in VS Code than in VS 2017 over the past several months. The “out-of-the-box”, “stock” experience with VS Code is truly fantastic and has provided me with just about all the functionality I’ve needed.

Sure, I’ve added some extensions such as C#, mssql, Babel JavaScript, and transformer to address some gaps but by and large, I’ve found the experience to be more than sufficient for my needs. That said, I recently attended a talk that began by highlighting a dozen or so of the interesting configuration options that can be set to tweak the experience.

Given that I’ve never really paid much attention to the settings I thought I should dive in, look over the nearly 500 settings, and highlight a few which I found most interesting. Although the vast majority are pretty typical for an editor there are plenty that can have a significant impact on the way we work so without further ado, here are my picks for the top 15 most interesting VS Code settings! (more…)

Feeling the Vibe

A little over two years ago my career took an unexpected turn. I found myself in a perfect position to begin life as an independent software developer. Since then I’ve been offering consulting and training services under the banner of Achiiv Solutions, LLC. (Don’t bother looking at the site – it’s just a placeholder!) In those two years I have had the good fortune of working on interesting projects with some really great clients.

About five months ago I started a contract with a Fishers, Indiana based startup called Fuzic. Their goal of controlling the vibe of a physical location through the combination of music and custom audio messaging so its customers could reach their customers in new ways intrigued me to say the least. At the time they were bringing development in-house and needed someone to maintain some aspects of the current production system and the timing was right for me to jump on board.

Originally I was going to be working only part time while I balanced this new work with some other projects I had underway but there was plenty of work to do and soon I was working a full-time schedule minus some conferences here and there. In the months since we’ve made significant enhancements to numerous aspects of the system and I’ve come to truly believe in what the company is doing.

The company’s visionary leadership has already established a strong foundation with a top-notch, high-performance team which includes some of the best people I’ve worked with in my career. What’s more is that the past few months have given me a front-row seat for several exciting milestones in the company’s history including:

With that, I’m pleased to announce that on October 16, 2017 I made the transition from contractor to Lead Software Engineer at Vibenomics! I believe that this company is going to do some great things in the coming years and am excited to see where this next chapter leads.

#VibeOn

Back to Basics: Overlooking the Obvious

Early Wednesday morning I arrived at the Kansas City Convention Center for KCDC, one of my favorite conferences. I chose the right door to enter the facility because immediately inside was my good friend Heather Downing.

Heather was hard at work putting the finishing touches on part of VML‘s sponsor booth exhibit – an Alexa skill to retrieve session and speaker information from the KCDC conference API. She already had the device responding to utterances such as “Alexa, ask KCDC when {speaker name} is speaking” and “Alexa, ask KCDC which sessions are about {topic}” but the final task, “Alexa, ask KCDC which sessions are next” was misbehaving by not returning the list of sessions at 8:30 on Thursday morning. She was clearly getting frustrated after fighting with it for some time and asked for a rubber duck and a second set of eyes.

The conference’s API returned sessions according to which time slot they’re in rather than the exact time so Heather had a list of objects that mapped the slots to the time along with some additional information unrelated to this issue. The method for selecting the time slot looked basically like this (simplified for brevity):

public static KeyValuePair<string, DateTime> GetNextSlot(DateTime start) =>
  SharedValues
    .SlotInformation
    .Where(sv => sv.Value >= start)
    .OrderBy(sv => sv.Value)
    .FirstOrDefault();

The SharedValues type exposes readonly fields that describe the various slots. Since this particular skill was intended for demonstration purposes and the slots weren’t changing, all of the values were hard-coded.

The call to GetNextSlot was equally straightforward:

// searchDate was UtcNow converted to Central time
var nextSlot = GetNextSlot(searchDate);

Since the next defined slot occurred at 8:30 AM (Central) it was bizarre that GetNextSlot was returning null. At first we thought that there was something was off with the conversion from UTC to Central time but even that should have returned something since the offset is only six hours and we were testing on Wednesday, not Thursday!

We mucked around with several different permutations before landing on the culprit – the initalization order in SharedValues!

As she had been building out the application Heather realized she needed the slot times in multiple places so she extracted the values to separate readonly fields so they could be referenced independently. The resulting code looked like this:

public static class SharedValues
{
  public static readonly List SlotInformation =
    new List
    {
      new SlotDescription ("Thursday, 8:30 AM", Slot1),
      new SlotDescription ("Thursday, 9:45 AM", Slot2),
      new SlotDescription ("Thursday, 11:00 AM", Slot3),
      new SlotDescription ("Thursday, 1:00 PM", Slot4),
      new SlotDescription ("Thursday, 2:45 PM", Slot5),
      new SlotDescription ("Thursday, 3:30 PM", Slot6)
    };

  public static readonly DateTime Slot1 =
    new DateTime(2017, 8, 3, 8, 30, 0);

  public static readonly DateTime Slot2 =
    new DateTime(2017, 8, 3, 9, 45, 0);

  public static readonly DateTime Slot3 =
    new DateTime(2017, 8, 3, 11, 0, 0);

  public static readonly DateTime Slot4 =
    new DateTime(2017, 8, 3, 13, 0, 0);

  public static readonly DateTime Slot5 =
    new DateTime(2017, 8, 3, 14, 15, 0);

  public static readonly DateTime Slot6 =
    new DateTime(2017, 8, 3, 15, 30, 0);
}

At first everything looks fine but sure enough, the fields are initialized in the order the compiler encounters them so SlotInformation is initialized first followed by each of the Slot values. Since each Slot value is DateTime and DateTime is a value type, the default value of 01/01/0001 00:00:00 is used when the SlotDescription instances are created!

As soon as we swapped around the initialization order (putting the Slot values before SlotInformation) everything worked exactly as we expected and we were finally able to ask “Alexa, ask KCDC which sessions are next.”

This just goes to show how experienced developers get caught up in a problem, they can spend way too much time digging into the complex while totally overlooking the obvious. If you’d like to observe this behavior in action check out the code sample over on repl.it.

Phishing Hook

Today I, along with a number of my friends got duped into clicking on a phishing attack posing as Google Docs link. The offending email essentially states that a document has been shared with you and gives a legitimate looking button enticing the unsuspecting target to click it. Since the email I received appeared to be from someone I’ve routinely share documents with via Google Docs I wasn’t as diligent as I normally would be and followed the link thus opening my Google account to the attack.

This particular attack resulted in many of my contacts being sent the same link. Although this attack compromised my Google account I don’t actively use it for anything beyond logging in to various Google services. That said, I do still have some contacts on there from when I did use it for much more so while quite a few of the emails bounced due to invalid addresses, other legitimate contacts have been emailed, tricked, and therefore affected.

Google has reportedly deactivated the offending app and is investigating the incident but since this paves the way for copycats I thought I’d share the steps for revoking permissions from apps that have been previously been allowed to access your Google accounts. It’s always a good idea to periodically review what you’ve granted access to anyway so without further ado…

1.) Navigate to the Google account permissions page.

2.) Locate the app you want to remove and click it. For example, I want to revoke permission for a Wheel of Fortune game I no longer play so I’ll click anywhere in the row pointed to in the image below. (The app responsible for today’s attack would be listed as Google Docs. I revoked the permissions once I realized what was happening – even before Google shut it down.)

ManagePermissionCollapsed

3.) Once the row is expanded, simply kick the “Remove” button.

ManagePermissionExpanded

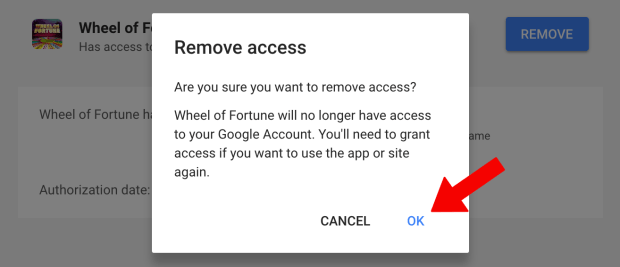
4.) You’ll then be prompted to confirm removing the app’s permissions. Click the “OK” button to remove the app’s access to your account.

ManagePermissionConfirm

5.) Upon clicking “OK” the app will be removed from the list.

ManagePermissionComplete

Indy.Code() Coming Soon!

Over the past few years life has taken me on an interesting journey. What started off as blogging led to writing a book, authoring some Pluralsight courses, receiving a few Microsoft MVP awards, and speaking at user groups and conferences around the world. Through all these activities I’ve connected with amazing people doing incredible things and have formed lasting friendships with people I’d likely have had little chance of meeting under other circumstances.

Whether it’s speaking at a conference or leading a class at Eleven Fifty Academy, being engaged in the global software development community, sharing knowledge, and fostering professional growth has become a major part of my lifestyle. Despite how proud I am of the work I’ve done one thing I’ve come to regret over time is how little of my efforts have been focused on my local community. Sure, I’ve spoken at user groups around the Indiana but most of my efforts have been focused in far away places.

Indianapolis, and Indiana for that matter, is primed to be a major player in the technology scene but too often we stay within our silos and fragmented communities. What Indiana has lacked for a number of years is an event to bring the entire community together. Together we’re stronger and that’s why I’ve partnered with my good friends Adam Barney and Ken Versaw of Amegala to bring Indy.Code() to Indianapolis!

Indy.Code() is a three-day conference covering all aspects of software development. It’s being held March 29-31 at the Indiana Convention Center in downtown Indianapolis. We’ve lined up more than 100 hands-on workshops and breakout sessions presented by some of the nation’s best technical speakers including several based right here in Indiana. We’ve also worked hard to ensure that there’s something for everyone involved in software development so whether you’re developing a brand new Angular 2 or .NET Core app, maintaining legacy systems, designing a user experience, or managing a project, Indy.Code() has something for you. Indy.Code() even has dedicated tracks for functional programming, mobile development, and project management! And finally, don’t forget about all the opportunities to connect with your peers. Perhaps you’ll meet someone who inspired your career or someone else who just solved that problem that’s been nagging you for a week.

Indy.Code()

So what are you waiting for? Don’t miss your opportunity to participate in this one-of-a-kind Indiana development event. Register for Indy.Code() today!

See you there!

C# 6 Verbatim Interpolated String Literals

It’s no secret that string interpolation is one of my favorite C# 6 language features because of how well it cleans up that messy composite formatting syntax. A few days ago I was working on some code that contained a verbatim string that included a few of the classic tokens and I wondered if string interpolation would work with verbatim strings as well.

After a quick glance over the MSDN documentation for string interpolation revealed nothing I just decided to give it a shot by adding a dollar sign ($) ahead of the existing at (@) sign and filled the holes with the appropriate expressions. Much to my delight this worked beautifully as shown in the snippet below!

var name = "Dave";
var age = 36;

var sentence = $@"Hello!
My name is {name}.
I'm {age} years old.";

Console.WriteLine(sentence);

I later discovered that even though this feature doesn’t seem to be listed in the MSDN documentation (at least anywhere I could find it) that it is explicitly called out in the C# 6 draft specification so hopefully it’ll find its way to the rest of the documentation at some point.

Functional C#: Debugging Method Chains

One of the most common questions I get in regard to the Map and Tee extension methods I presented in my recent Pluralsight course is “That’s great…but how do I debug these chains?” I get it – debugging a lengthy method chain can seem like a monumental task upon first glance but I assure you, it really isn’t all that difficult or even much different from what you’re accustomed to with more traditional, imperative C# code.

I’ve found that when debugging method chains I typically already have a good idea where the problem is. Spoiler: It’s in the code I wrote. That means that I can almost always automatically rule out any chained in framework or other third-party library methods as the source of the problem. It also means that setting a breakpoint within a chained lambda expression or method is often an adequate first step in isolating the problem. This is especially useful when working with pure, deterministic methods because you can then write a test case around the method in question and already have the breakpoint right where you need it.

In some situations though, you want to follow computation through the chain but constantly stepping through the extension methods can be both tedious and distracting, especially when the chained method is outside of your control and won’t be stepped into anyway. Fortunately this is easily resolved with a single attribute.

The System.Diagnostics.DebuggerNonUserCodeAttribute class is intended specifically for this purpose. As MSDN states, this attribute instructs the debugger to step through rather than into the decorated type or member. You can either apply this attribute to individual methods or to the extension class to prevent the methods from disrupting your debugging experience. For my projects I opted to simply suppress all of the extension methods by decorating the class like this:

[DebuggerNonUserCodeAttribute]
public static class FunctionalExtensions
{
    public static TResult Map<TSource, TResult>(
        this TSource @this,
        Func<TSource, TResult> map) => map(@this);

    // -- Snipped --
}

With the attribute applied, you can simply set a breakpoint on the chain and step into it as you normally would. Then, instead of having to walk through each of the extension methods you’ll simply be taken right into the chained methods or lambda expressions.

Enjoy!

Functional C#: Chaining Async Methods

The response to my new Functional Programming with C# course on Pluralsight has been far better than I ever imagined it would be while I was writing it. Thanks, everyone for your support!

One viewer, John Hoerr, asked an interesting question about how to include async methods within a chain. I have to be honest that I never really thought about it but I can definitely see how it would be useful.

In his hypothetical example John provided the following three async methods:

public async Task<int> F(int x) => await Task.FromResult(x + 1);
public async Task<int> G(int x) => await Task.FromResult(x * 2);
public async Task<int> H(int x) => await Task.FromResult(x + 3);

He wanted to chain these three methods together such that the asynchronous result from one task would be passed as input to the next method. Essentially he wanted the asynchronous version of this:

1
    .Map(H)
    .Map(G)
    .Map(F);

These methods can’t be chained together using the Map method I defined in the course because each of them want an int value rather than Task<int>. One thing John considered was using the ContinueWith method.

1
    .Map(H)
    .ContinueWith(t => G(t.Result))
    .ContinueWith(t => F(t.Result.Result));

This approach does play well with method chaining because each method returns a task that exposes the ContinueWith method but it requires working with the tasks directly to get the result and hand it off to the next method. Also, as we chain more tasks together we have to drill through the results to get to the value we really care about. Instead what we’re looking for is a more generalized approach that can be used across methods and at an arbitrary level within the chain.

After some more discussion we arrived at the following solution:

public static async Task<TResult> MapAsync<TSource, TResult>(
    this Task<TSource> @this,
    Func<TSource, Task<TResult>> fn) => await fn(await @this);

Rather than working with TSource and TResult directly like the Map method does, MapAsync operates against Task<TResult>. This approach allows us to define the method as async, accept the task returned from one async method, and await the call to the delegate. The method name also gives anyone reading the code a good visual indication that it is intended to be used with asynchronous methods.

With MapAsync now defined we can easily include async methods in a chain like this:

await 1
    .Map(H)
    .MapAsync(G)
    .MapAsync(F);

Here we begin with the synchronous Map call because at this point we have an integer rather than a task. The call to H returns a Task so from there we chain in G and F respectively using the new MapAsync method. Because we’re awaiting the whole chain, it’s all wrapped up in a nice continuation automatically for us.

This version of the MapAsync method definitely covers the original question but there are two other permutations that could also be useful.

public static async Task<TResult> MapAsync<TSource, TResult>(
    this TSource @this,
    Func<TSource, Task<TResult>> fn) => await fn(@this);

public static async Task<TResult> MapAsync<TSource, TResult>(
    this Task<TSource> @this,
    Func<TSource, TResult> fn) => fn(await @this);

Both of these overloads awaits results at different points depending on the input or output but they each operate against a Task at some point.

So there you have it, a relatively painless way to include arbitrary async methods within a method chain.

Thanks, John, for your question and your contributions to this post!

Have fun!